Contents
Are you grappling with guitar bridge repairing? Then keep reading this article.
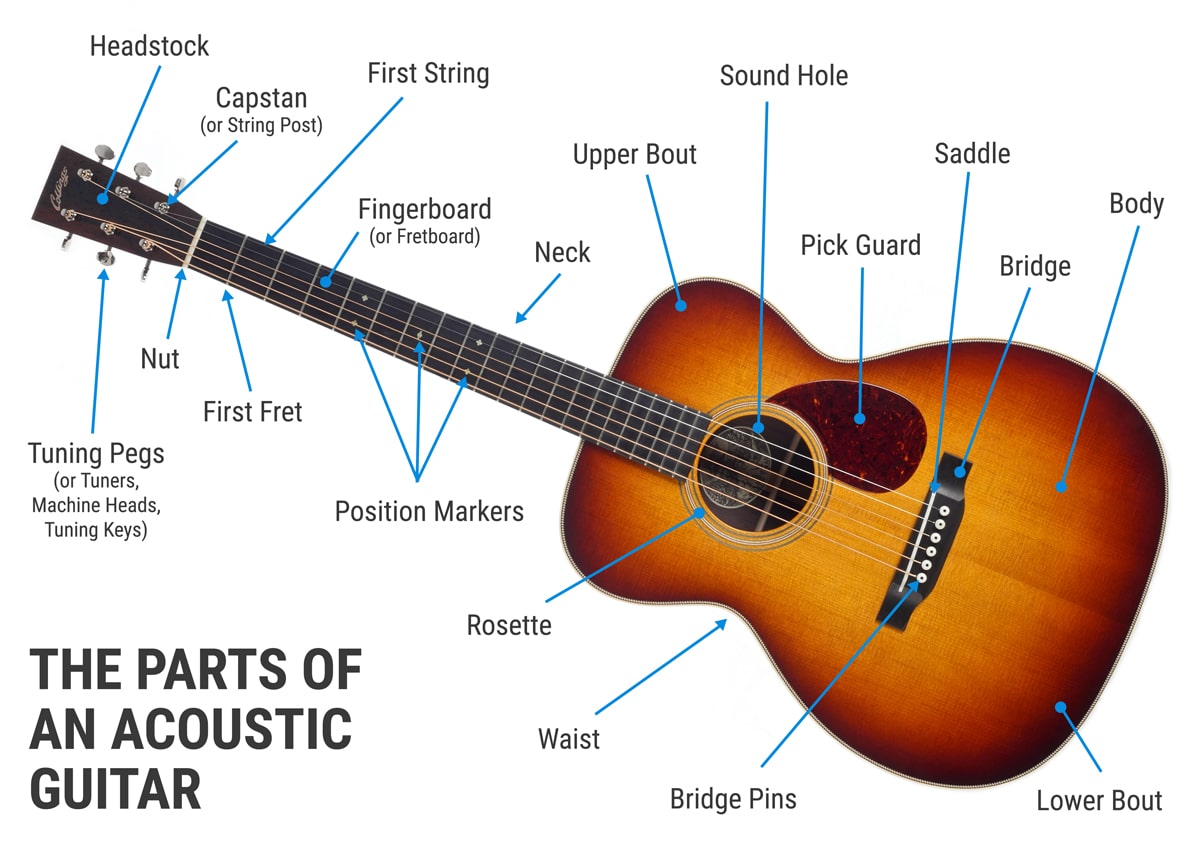
Before you learn how to fix the bridge of a guitar, you need to know why and how it’s vital for fine-tuning a guitar The bridge on the guitar is the bit that holds the strings as they travel over the guitar body. It functions as the component that carries the vibrations of the strings into the body, which, with an acoustic guitar, magnifies them.
On many electric guitars, the height of the bridge can be regulated, which adjusts the distance between the strings and the fingerboard- known as the playing action. If you hear your guitar sound thinner or quieter than normal, that could be a sign that your bridge is loose. A guitar bridge not only sets the placement of the cords but also plays a central role in good tuning, action, and intonation.
Here we discuss how to fix the bridge of a guitar and ways to maintain it accordingly.
Diagnosing The Root Cause
This is the first step in fixing the guitar bridge. Check if your bridge is loose or cracked.
If so, you need to remove it from the body and re-glue it or replace it.
Look at the back of the bridge. Do you see a gap in between the bridge and the body? If so, it has come loose. Sometimes the gap is so small that you can’t see it easily. Take a piece of paper and slide it between the bridge and the body.
Once you determine that you have to remove the bridge, get a card stock piece of paper and trace the bridge out on it. Then cut the bridge out of the paper. You can place the piece of paper down around the bridge like a guard while you are removing it to protect the finish.
Removing The Bridge
Prepare some hot glue. Because your next step will be to cut out the whole piece.
Place a heating pad on top of the bridge for a minute to heat the glue. If you don’t want to buy a heating pad, you can also use a clothes iron with a towel to mask the bridge. Be very careful with your pick.
Peeling The Bridge
After the glue is warm and loose, you can take a malleable, blunt knife and try it between the bridge and the body. Be careful not to harm the altering. As there are different guitar bridge types, you need to be careful with their peeling for a definite type. You may have to heat it a few times to get the putty knife all the way across the bridge. Just take everything nice and slow.
Positioning The Guitar
It is quite important to position your bridge up well before you glue it down. Otherwise, you might have to redesign everything. Measure and point the centerline of the bridge on the bottom and front parts. That way you can line up the centerline on the bridge with the centerline of the guitar body.
Running Dry
Once the bridge and the body are fully cleared, clamp them closely with no glue. This is what a dry run is. Whenever you are gluing anything effective on a guitar, try to go for a dry run.
Gluing The Guitar Bridge
After a successful dry run, you can apply the glue. The bridge has to be firmly tied with the body. Put a good amount of glue on the body and clamp the bridge down just like the dry run.
Note: A successful guitar bridge repair is incomplete by rubbing off the surplus glue. This will ensure proper fixing of it. Give the glue some time to dry.
Always try to keep your guitar in a cool environment like room temperature or below that to prevent your bridge from shifting or loosening.
Conclusion
Take the clamps off the next day and you are fit to restring your guitar.
It is important to choose the best guitar parts to make sure you spend less on its repairs and more on practice. Always select guitar bridge from trusted stores and sites so you get a guarantee of its quality.
Hence, your guitar is ready to strike its next tune!