Contents
If you are a vlogger or a voice-over artist or simply a live streamer, then you might understand the importance of a good mic setup. To be precise, along with good video quality, the audio quality should also be top-notch if you want your content to be attractive to your viewers. But often we notice that various users have a common complain – ‘my mic picks up everything’. This actually means that the mic is not correctly functioning and is continuously picking up various background noises which degrade the overall audio quality.
How to solve the issue of “my mic picks up everything”?
- First, let us look into the hardware
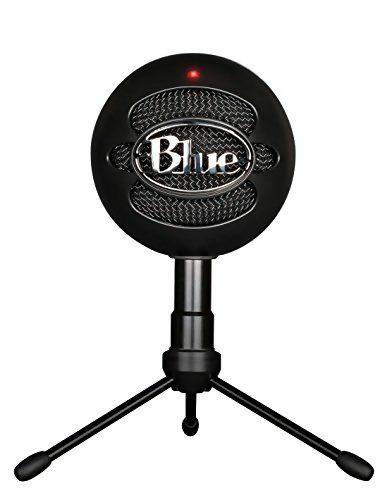
If you are interested in getting the best sound quality for your videos and content, you should invest in a better microphone and some equivalent set up. Well, you need not worry as with a small investment of less than $50, you can get the Blue Snowball Ice.
However, to prevent the issue of “your mic picks everything”, a goog microphone is not enough. You will also need to get yourself a good and stable microphone stand which you can get for less than $10. So, with a good microphone, a stand and a good pop filter, you will be able to focus entirely on your content as your audio quality will be at its best.
So, once you get all these things done, you can now start to focus on your overall ambience and microphone setup. In order to get a high-quality sound for your content, you should arrange your recording room in such a way that your microphone is prevented from too much echo or any other kind of disturbing background voices such as keyboard sounds, mouse movements or any other kind of similar noises. Apart from this, try to close most of the doors and windows of your recording room so that the outer noise does not come within the vicinity of your microphone and your mic does not pick any kind of ambient noises.
- Use the noise cancellation software
So, once the hardware issue is covered, you can now put your emphasis on software. In order to get the finest audio for your content, you can use noise cancellation software which will prevent your microphone from picking any kind of unwanted voices.
The Noise Gate is such a filter which can be used to prevent your microphone from picking up various noises. This filter has a setting through which you can adjust and change the range of decibels of sound which it will respond to. So, in case you are shooting outside or you are in a crowd, you will be able to cut off the unwanted range of decibels and record the one which you need for your content.
However, you should be careful with the setting of Noise Gate as you will need to adjust the upper limit and the lower limit of the vocal range so that in case you start to speak a little slower, your voice does not get rejected by the software.
OBS is one such software which has the Noise Gate inbuilt within its configuration. However, one limitation of this software is that it can only be used with the Windows 10 operating system or higher versions.
Apart from OBS, Noise Blocker is another popular option which can be used with the Noise Gate. You can either buy it for 9.99 dollars for full subscription or else, you can also use it for free for an hour every day.
However, if you do not want to spend any money, you can opt for Noise Gator. This is absolutely free and is quite famous among various vloggers. This software, however, has various problems and suddenly stops during working. Unfortunately, the developer of this software has abandoned the project and you will not be able to get any kind of updates to resolve the issues.
- Clean the audio clip after you finish with your recording
So, even after using good hardware setup and noise cancellation software, if you are not getting satisfactory audio quality, then you will need to use some software to clean the audio file after you have finished recording. One such application which will serve the purpose is Audacity.
Frankly speaking, Audacity is an audio editing software which will help you to cut out any part of the audio which you feel is defective and will also allow you to cut out any kind of mistakes in your recording.
So, let us now get a step by step guide as to how you can use Audacity.
-
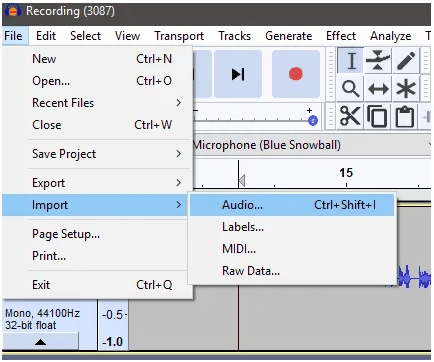
- Once you have downloaded Audacity and installed it, open it and press on the File tab. After clicking on File, click the tab showing Import and consequently press Audio. You will now have the option to choose the clip which you want to edit and once you have selected the particular audio file which you wish to edit, click Open.
-
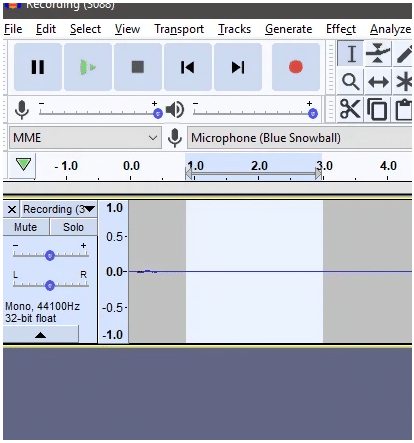
- Once you have opened the audio file, you need to reduce the ambient noise. So, in order to do that, press and drag the initial part of the clip to obtain a void area of the clip. You should, therefore, try to have a blank beginning before recording your audio clip.
-
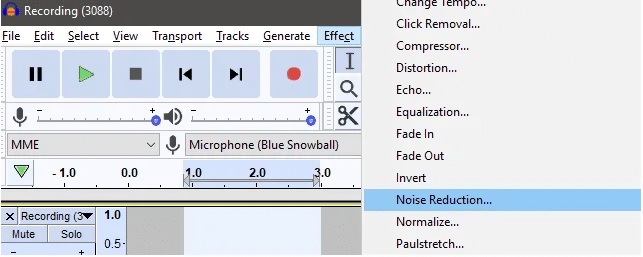
- Now, click on the Effect tab on the topmost toolbar and select the tab showing Noise Reduction.
-
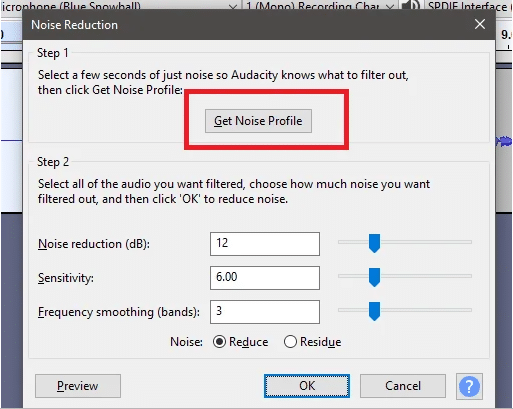
- Now, a popup window will appear in which you have to click on the Get Noise Profile tab.

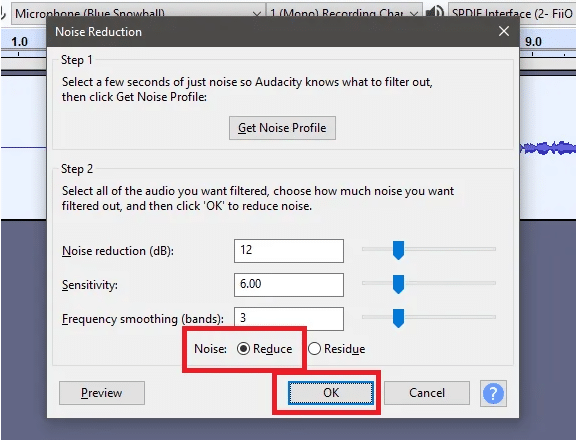
- Consequently, you need to press “CTRL+A” to select the entire sound profile. After this, press Effect and click on the Noise Reduction once again and once you are sure that the entire audio clip is selected and highlighted, you can now press Ok. As a result, all the background noises will now be removed.
-
- Now, it is time to listen to your recording. If you find that some part of your audio clip is too noisy, you can adjust the level of your clip by using Compressor which is available on the Effects tab. However, if you find that your audio clip is dull or quiet, you can amplify the particular part which is also available under the Effects tab.
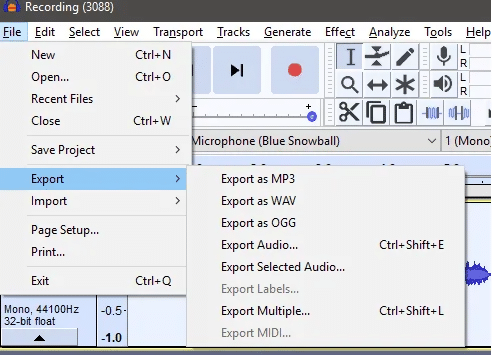
- So, once you are done with all the steps, you can now press on the Files tab and click on Export. You will be able to export your edited audio clip in WAV, MP3 and various other formats of your choice.
How to adjust sound settings in your computer to reduce picking up of background noises by your microphone?
Sometimes, the issue of “your mic picks everything” becomes even more problematic when you are in crowded places. Suppose, you are not using any kind of headset and relying completely on your computer speakers and microphone, altering the audio settings of your PC can save your day and reduce the echo problems to a great extent.
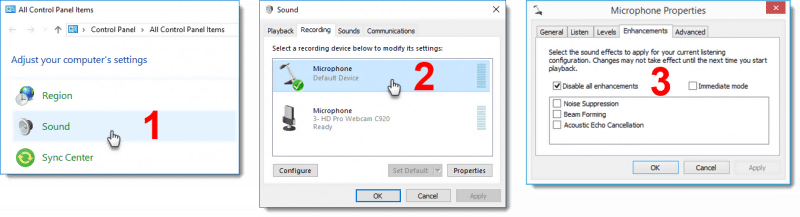
Windows:
- Go to the Control Panel and select the option “Sound”.
- Select the tab of Recording, and right-click on the Microphone icon.
- After this, select the Properties tab.
- Once the above is done, click on the Enhancements and disable all of them and finally press on the Apply tab.
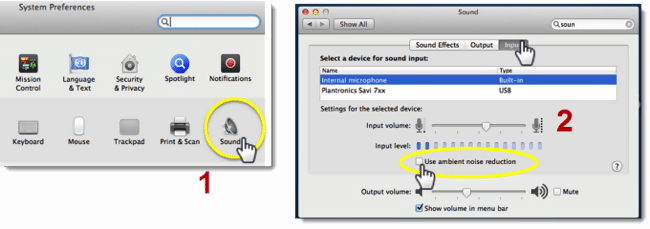
Mac Configuration:
- On the Launchpad, press on Sound.
- There you will find a tab of Input. Click on it and untick the tab of “use ambient noise reduction” and shut the window.
So, once you follow all the steps, I am sure that you will never complain that your mic picks up everything.

Hi music fan! I am Jeff. Hope that you enjoy some stuff I shared here in my personal blog.
About myself, Currently I am in charging as Artist Manager/Music Supervisor at 72 Music Management. I did managed album to Grammy Award in 2017 with 7 Nominations from 2014-2020 and had the opportunities to work with : A.J. Croce, Blind Boys of Alabama, Bobby Rush, Dom Flemons, Dustbowl Revival, Sarah Grace
Governor of the Memphis Chapter of The Recording Academy is one of a award that I am lucky to achieved.