Contents
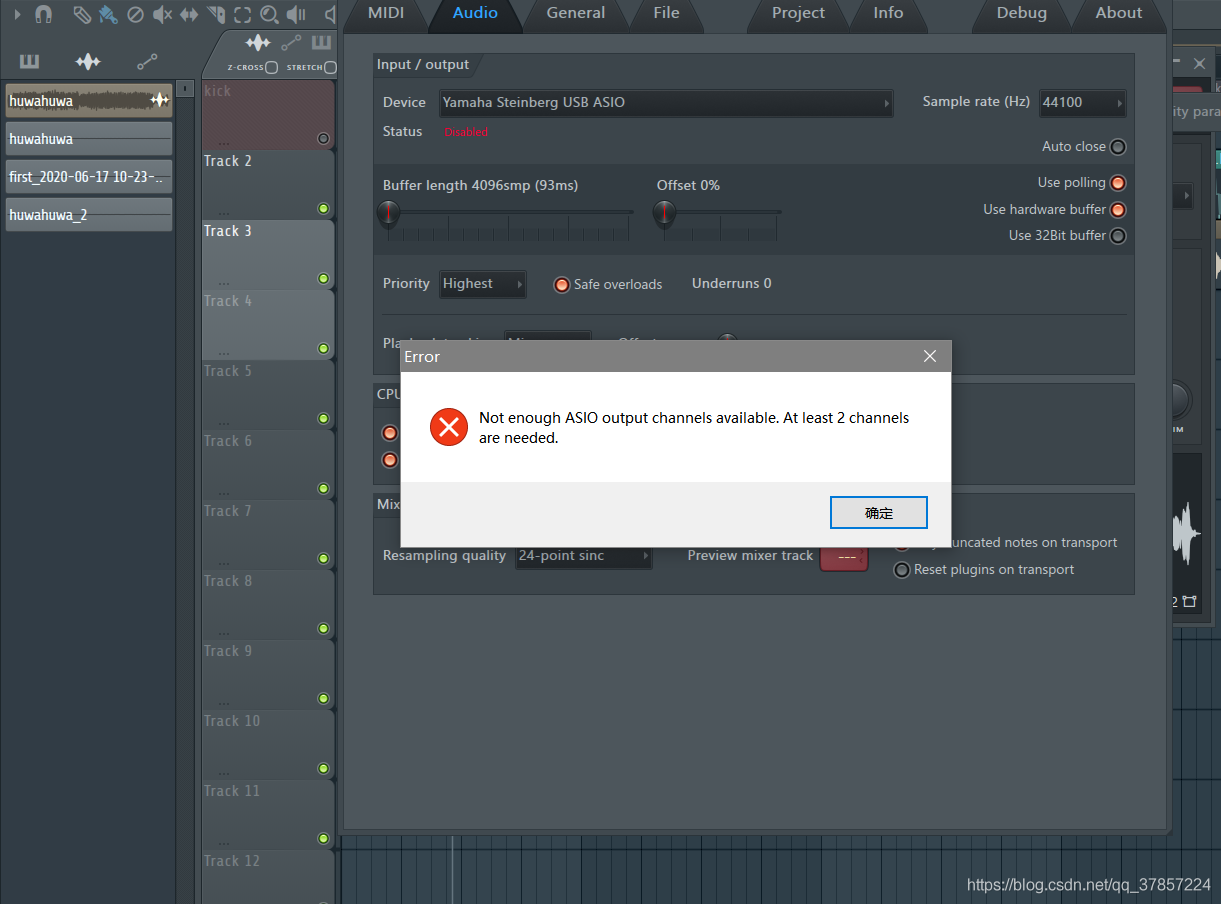
Among the most annoying problems music producers and editors face is when they encounter the error “Not Enough ASIO Output Channels Available. At least 2 channels are needed.” And, in most cases, you can find this problem when you are using FL Studio. This is because this particular digital audio workstation (DAW) is overly sensitive to ASIO drivers. With that being said, let’s get directly into knowing the ways to keep this issue at bay, especially when using FL Studio.
Simple Fixes to Combat Not Enough ASIO Output Channels
We have started to discuss this in our previous post. We gave you a brief background on this issue, what are the possible triggers and, of course, some proven tricks to solve the problem. The main reason why such a difficulty occurs is when your audio interface is being used by other apps or FL Studio wasn’t properly shut off.
For the solution, we offered you some basic troubleshooting steps like restarting your computer, installing/reinstalling the driver, etc. However, we found more ways out of this dilemma.
That’s why we made this article. Some of them are quite obvious and don’t require much tinkering. Let’s get started with the additional four solutions.
Connecting Your Audio Interface to the Right USB Port
This might be such a tiny consideration, but it’s very crucial to have your audio interface work well with the FL Studio. A concrete example would be that from a YouTube channel Blog Ternet who shared his encounter with this issue using his Roland Octa-Capture. “Not Enough ASIO output channels…” error was first encountered when the audio interface was connected to a USB 3.0 port.
If you have the same interface, you have to note that it works better when connected to a USB 2.0 port. Once you can connect it to the right USB port, you’ll get rid of this troublesome error message right away.
Unplug Audio Interface and Restart Your Computer
In the previous article, we suggested you restart your computer to kill all programs that might have used the audio interface you’re trying to access. However, if this doesn’t work for you, maybe this one will.
First, unplug all the cables connected to your computer – cables that are connected to your audio device. Turn off your computer. Then, while the computer is still off, try to connect all the cables to your computer. You can also try switching USB ports just to check. Turn on your computer. And, by doing so, your computer will be able to display and detect the audio interface that you’re going to use.
Try the Audio Interface with Another DAW
As mentioned in the introduction, FL Studio is very sensitive compared to its counterparts. So, why not leverage this known fact to your advantage? Try to use other DAW just to check if they can establish a connection with your audio interface.
If they can, perhaps, surely, the problem is with your FL Studio. Maybe it was not selected as the output device in your FL Studio. To check, go to Options>Audio Settings. If it’s not selected, then, just look for your audio interface in the dropdown list.
Disable Your Audio Interface
FL Studio still can’t communicate with your audio device because you can’t select it as an output device? When you go to Options>Audio Settings and select the output device you want to use, you will be prompted with this error message.
Don’t worry, you are still left with one workaround. In the taskbar, you can find the speaker icon (🔊), right-click on it, and select Sounds. The Sounds popup window will appear where you can choose what you will do with all the available audio devices (internal or peripheral) that are connected with your computer.
Actually, when it comes to FL Studio, it wants exclusivity with the audio interface you assigned to it. This means, if some other apps, even if Windows itself will use that particular output device, it’ll automatically return the error. To avoid this same occurrence in the future, follow the following:
In the Playback tab:
- If you aren’t in the Playback tab already, just simply click on that tab. (Other tabs available are Recording, Sounds, and Communications.)
- Look for the audio interface you want to use. If your computer has detected it, you should see it in the list.
- Right-click on it and click Disable.
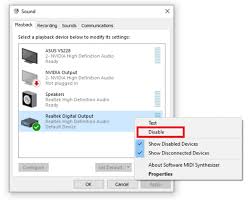
- Yet, prior to disabling it, you should enable any of the other output devices on the list. (This is to make sure that your system still has something to use while you disable an output device.)
- Just enable any on the list, then try to repeat Step 3.
In the Recording tab:
- Now, navigate to the Recording tab.
- Just do Steps 2-5 in the instructions under the Playback tab, but this time, do it in the Recording tab.
- Click Apply and click the OK button to save the actions that you take.
Check out how this is done in the YouTube video below. This is particularly useful for M-audio Fast Track.
To check if this method works, relaunch your FL Studio. Go to Options>Audio Settings. In the dropdown, select the audio interface. You should be able to select it without having to bump into the error.
Conclusion
Another problem fixed: “Not enough ASIO output channels…” Although we have previously tackled this problem, there are still other working solutions, and they deserve to be in another article. As you can see, these solutions gave you more specific details and some extra steps that weren’t mentioned previously.
In case you have other working solutions that aren’t mentioned in this article and in the past, you might want to share them, so we can feature them. Getting outputs and giving inputs to fellow FL Studio users is a great way to help. After all, our ultimate goal is to pour out our best in every music piece that we have created.
Hi music fan! I am Jeff. Hope that you enjoy some stuff I shared here in my personal blog.
About myself, Currently I am in charging as Artist Manager/Music Supervisor at 72 Music Management. I did managed album to Grammy Award in 2017 with 7 Nominations from 2014-2020 and had the opportunities to work with : A.J. Croce, Blind Boys of Alabama, Bobby Rush, Dom Flemons, Dustbowl Revival, Sarah Grace
Governor of the Memphis Chapter of The Recording Academy is one of a award that I am lucky to achieved.