Contents
How do you measure drum heads? Do you measure from Rim to Rim, or from the edge of Skin to of Skin? These are the few questions that arrive in our minds while thinking of measuring drum heads. It is quite an easy task to measure a drum head on an acoustic drum set. There are just a few simple steps that need to be followed in a certain order, and there is amount of work involved. The dimensions of a drum will affect not only the sound that you hear but also the whole mix if we’re talking about a studio recording.
Of course, a drum’s dimensions are important when buying cases for your drums. In short, drums are measured by taking the diameter and height. Most often, dimensions are stated as height by diameter of the shell itself without the hoops. In addition to that, drum heads are sold by diameter so it is important to know the diameter of the snare drum before acquiring a new head. Players have a lot of freedom when choosing drums, but it is important to correctly measure a drum to get a feel for how it will sound before buying one
So, if you want to know how to measure drum heads, here are the steps that need to follow:
Method 1
Step 1: Remove the drum head
To measure a drum correctly you should remove the drum head from the top or bottom.
Step 2: Measure the shell
Once the head is off of the drum then measure just the shell from the outside edge directly across the center of the shell. This is the drum width.
Step 3: Measure the depth
Then measure the depth from the inside of the drum from the shell top edge and bottom edge.
It is more common when you list drum sizes to put the drum Depth-first then the drum Width. Some drum shells are covered and have overlapping seams. It is best to measure across the drum shell in a few locations and average the dimensions.
Looking at the pictures above the drum is 8” deep x 12” wide. This is an 8” x 12” tom.
So a 5” X 14” drum is 5” deep with a 14” width. The width is also referred to as the head size. So that is usually called a 14” drum.
On American made drums it is more common to see depths of 5”, 5 ½”, 6” or bigger. You will not usually see a drum that is 5 ¼” unless someone measured it wrong. Smaller depth drums can go as low as 3” or 4” etc. and usually called piccolo snare drums.
Other than that people commonly list drums like this.
22,13,16 or 13,16,22. This would mean a 22” inch bass drum, 13” mounted tom and 16” inch floor tom.
You will see all sorts of different drum measurements and ways of displaying them.
Method 2
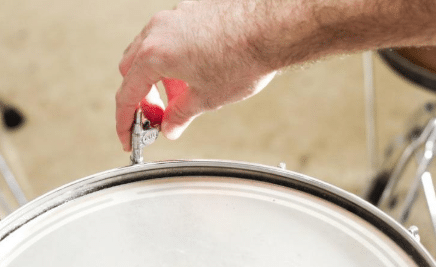
Use a drum key
A drum key is usually included with a drum set or can be purchased at a music store. Just loosen the lug screws on the top of the drum. The lug screws are usually rounded at the top, and the drum key will fit snugly along the top of the lug screw. After all of the lug, screws have been loosened, remove the metal hoop and the old drum head from the drum which will leave you with just the shell of the drum.
Method 3
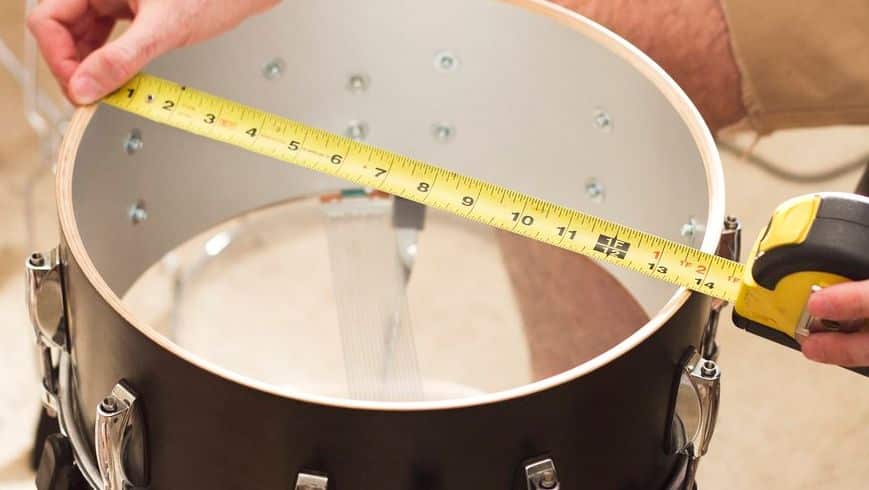
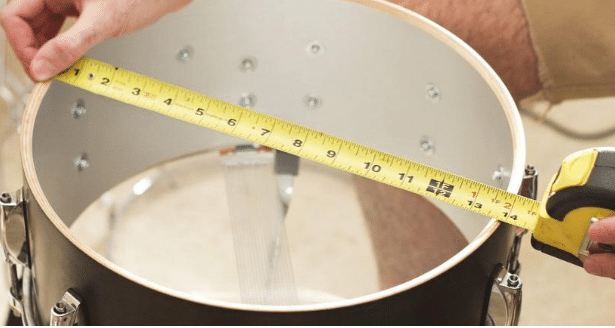
Using a tape measure
Just get a tape measure and measure the inside diameter of the rims on your drum and it should be pretty close to an even number of inches, if not, just round to the closest inch. That is the size of the head you need. Measure the diameter of the drum shell from the outside of the shell with the help of a tape measure. This distance will give you the exact measurement of the new drum head you will need as a replacement. For example, if the bass drum measures 22 inches, you will need a 22-inch drum head.
Once a drum head has been purchased, place the head on the shell and replace the metal hoop on the top. The drum head may appear slightly bigger than the shell; this is normal and will tighten down as the steps are completed.
Moving along the metal hoop, hand tighten the lug screws around the drum until they are finger tight. This will keep the drum head in place.
To complete the process, take the drum key and carefully tighten the lug screws. It is important to tighten no more than a full turn. This can cause an uneven surface for playing and can change the tone of the drum. While carefully tightening the lug screws, use a star-pattern; do not go directly around the hoop when tightening, instead tighten one lug screw then moving to the lug screw directly across the drum. Using the drum key, tighten or loosen the lug screws along the metal hoop to tune the drum to the desired tone. Use the same star-pattern when tuning as was used when securing the drum head.
The above steps can also be applied to hand drums. The tool, however, is typically a wrench instead of a drum key. More often than not, the correct size wrench is included with the purchase of a hand drum, thus eliminating the need to find and/or purchase the necessary wrench.
Tips
Be very careful while measuring the diameter of the drum so as not to scratch or damage the drum When tightening the lug screws with the drum key, turn each screw the exact number of turns Give the drum head time to settle onto the drum before playing, usually 24 hours is long enough.
Warning
Make sure to measure the drum with a metal hoop and old drum head removed. If you do not then this could lead to an inaccurate measurement. Tighten the lug screws just to the point where it is fairly difficult to turn the drum key. However, it is vital to not over-tighten the lug screws.

Hi music fan! I am Jeff. Hope that you enjoy some stuff I shared here in my personal blog.
About myself, Currently I am in charging as Artist Manager/Music Supervisor at 72 Music Management. I did managed album to Grammy Award in 2017 with 7 Nominations from 2014-2020 and had the opportunities to work with : A.J. Croce, Blind Boys of Alabama, Bobby Rush, Dom Flemons, Dustbowl Revival, Sarah Grace
Governor of the Memphis Chapter of The Recording Academy is one of a award that I am lucky to achieved.